Remote support has quietly become one of the most “make or break” parts of modern IT work. Users are working from home, from client sites, from random hotel Wi-Fi. Yet they still expect someone to “just fix it” when their VPN, printer or business app misbehaves.
For the agent, that usually means one thing:
you need eyes and hands on their desktop
without being physically present.
This article is written for
IT professionals and support agents
who either already use remote support tools or are discovering
RDS Tools Remote Support
for the first time. We aim to do two things:
-
Give you a
short, practical refresher
on how RDS-Remote Support works from the agent side.
-
Provide you with a
ready-made, copy-and-paste script
you can send to users to walk them through sharing their desktop on Windows 11 (with a quick note for Windows 10).
1. Desktop Sharing 101: What Actually Takes Place?
-
1.1 Screen Viewing vs Remote Control
-
1.2 Attended vs Unattended Sessions
-
1.3 The User’s Three Big Questions
Before jumping into tool specifics, it helps to have a clean, user-friendly way of thinking about what “sharing your desktop” really means. If only because that helps us better describe the process to others.
Screen viewing vs remote control
At a high level, a remote support session does two things:
-
Streams the user’s display
to the agent (screen viewing).
-
Optionally
sends keyboard and mouse input back
from the agent to the user’s machine (remote control).
RDS-Remote Support, like other professional tools, is built exactly around these two ideas: encrypt the traffic to show you the end-user’s desktop, then let you interact as if you were at their keyboard.
How is Windows desktop shared via attended vs unattended sessions?
From an IT process point of view, there are two common modes:
Attended access:
The user is present. They launch the client, read you an
ID and password
, and you connect. This is the typical “helpdesk call” scenario.
Unattended access:
You have pre-deployed an agent on machines you manage so you can reach them without user interaction (for maintenance, patching, after-hours work). The user has agreed beforehand to this being set up.
For this article we focus on
attended
sessions, because that is where clear user instructions matter most. Unattended session will potentially be set up in collaboration with the host user during an attended session. Or it may otherwise be part of the standard built-in company habit and therefore not a topic of discussion.
What are the user’s three big questions?
If you listen carefully, almost every non-technical user really wants to know just three things:
1. “Can you see everything?”
Yes, if a host shares their
entire desktop
the technician can see whatever is on that screen. Here is why a protocol can include telling them to close private apps prior to a support session.
2. “Can you get back in later?”
With RDS-Remote Support’s attended mode, you rely on a
temporary ID and password
generated by the end-user client. When they close the chat/session window, that access ends entirely.
3. “Is this safe?”
When the software comes from a trusted source (your organisation or the official RDS-Tools download page) and the connection is encrypted, it is as safe as any other enterprise-grade remote access solution.
If you can answer those three questions confidently, you have already removed most of the fear around screen sharing.
2. Why share Windows desktop with RDS-Tools Remote Support?
-
2.1 Positioning RDS-Remote Support in the IT Toolkit
-
2.2 Key Features for Service Desks and MSPs
What is the Positioning of RDS-Remote Support in the IT Toolkit?
RDS Remote Support
is RDS-Tools’ dedicated remote assistance product for IT pros and support teams. It’s designed to let you:
-
Provide
instant attended or unattended access
to remote Windows PCs, and now also support macOS.
-
Fix issues, do maintenance and guide users through tasks via
screen sharing and remote control
over an encrypted connection.
What are some key features for service desks and MSPs?
The following characteristics especially matter for service desks and MSPs:
No installation required for the core clients
Both the Agent and the End-user executables are
download and run
they're connection clients, not heavy installers.
Two flavours of client
-
T
he
Agent executable
a full-featured console to control sessions and access tools.
-
The
End-user / Lite executable
a streamlined window that only shows the ID, password and chat/file sharing, keeping the UX simple for non-technical users.
In-session tools for serious troubleshooting
Within a session you can access built-in tools like screenshots, session recording and quick links to system utilities (Task Manager, Services, Control Panel, Registry Editor, PowerShell, etc.).
Built for modern remote support workflows
RDS-Remote Support is positioned as a
solution for IT teams and customer support organisations
that need to help remote users securely and at scale, not as a one-off consumer remote desktop app.
If your readers are already using Windows’ built-in Remote Assistance or Remote Desktop, RDS-Remote Support essentially becomes the
more manageable, user-friendly layer
on top of those concepts, with better UX and centralised control. And what’s more, you can adapt our software to your company colours (logos and all) and embed it in your website.
3. Quick brush-up for agents: How about your side of RDS-Remote Support?
-
3.1 Getting Set Up
-
3.2 Starting a Session (Agent Workflow)
-
3.3 During the Session: Tools and Best Practices
-
3.4 Ending the Session and Documenting Work
This section is meant as a
refresher
for agents and professionals keen to ensure nothing is forgotten (or has changed), the part of the article you read once, then rarely need again.
3.1. Getting set up
1. Check prerequisites
RDS-Remote Support supports Windows desktop from
Windows 7 SP1 onwards
Windows Server 2008 R2+, and macOS Monterey 12.3+ for the agent side. .NET is required on Windows.
2. Download the clients
From the RDS-Remote Support installation / quick-start page you will find separate downloads for:
-
Support Agent (Windows)
-
Support Agent (Mac)
-
End-user (Windows)
3. Run, don’t install
Both Agent and End-user tools are
portable executables
that means you simply run the .exe instead of installing a full application.
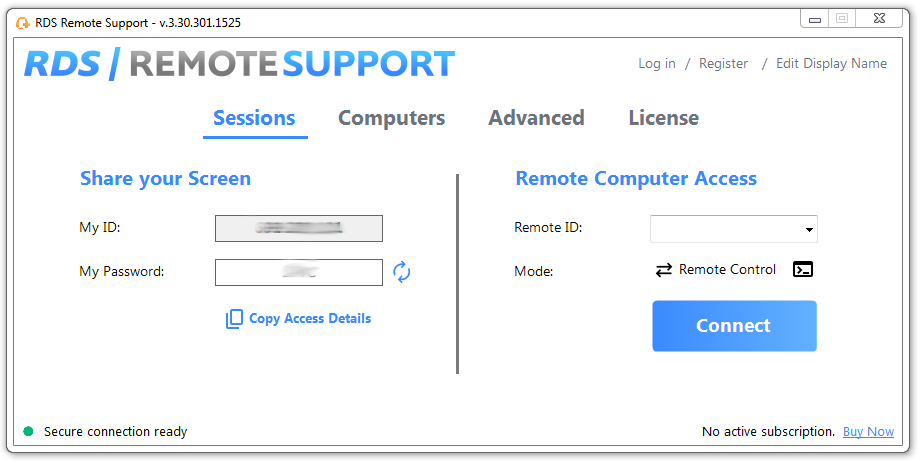
3.2. Starting a session (Agent workflow)
-
Ask the user to
run the End-user / Lite executable
.
-
Once it’s open on their side, they will see a
User ID
and
Password
in the client window.
-
In your Agent console, use the
Remote Computer Access
section on the right:
-
Enter the
ID
in the “Remote ID” field.
-
Click
Connect
.
-
When prompted, enter the
Password
.
-
On successful authentication, you shall see their desktop and gain control of the mouse and other peripherals, subject to their OS permissions.
3.3. During the session
From here, your routine is:
-
Use
chat
to communicate with the user through the session box.
-
Use
file sharing
in that same chat box to exchange logs, installers or screenshots.
-
Use
system tools
Task Manager, Services, registry, etc. launched from the Agent actions area to troubleshoot more quickly.
-
Switch monitors if the user has multiple displays, and optionally capture screenshots or record the session for documentation.
3.4. Ending the session
Either party can end the session:
-
If the
user closes the Remote Support chat box
the session terminates immediately.
-
You can also close the connection from your Agent console.
For ticketing, you would normally:
-
Log what was done in your ITSM tool.
-
If needed, attach screenshots or session recordings that you exported.
4. A ready-to-send template: how to explain it to users
This is the part most agents will want to copy straight into emails, chat scripts or knowledge base articles.
How might you use this printable?
You can email it to your users in either form, post it where you embed your RDS-Tools Remote Support link or what you see fit. They are
Copy & Paste Instructions for Users
”.
The idea is that for you as an IT agent, this text is a base you can customise, if only the pieces in square brackets (your client’s name, your name & company, as well as the actual download link), and sends it to the end-user.
The printable PDF and text:
Template of
Instructions to send to your user
Windows 11, with Windows 10 note
Subject:
How should you share your screen so I can help you?
Hi
Host User Name
,
To fix your issue remotely, I’ll briefly share your screen using our secure support tool,
RDS Remote Support
I will only be able to see your screen while this tool is open, and
you can close it at any time to end the session
.
Before we start, please
close anything private
personal email, banking pages, photos, etc. Then follow these steps:
Step 1: Open the Remote Support file
-
Open the email or chat where you received this message.
-
Click the link or attachment named something like
RemoteSupport-EndUser.exe
or
RDS-Remote Support (End User)
.
-
When your browser asks what to do, choose
Save
or
Open
.
-
If you saved it, open your
Downloads
folder and double-click the file to run it.
On Windows 11, you can open your Downloads folder from the taskbar by clicking the folder icon, then selecting
Downloads
on the left.
Step 2: Allow Windows to run it
When you run the file, Windows may show a security prompt:
-
If you see
Windows protected your PC
:
-
Click
More information
.
-
Click
Run anyway
.
-
If you see a message asking
“Do you want to allow this app to make changes to your device?”
Click
Yes
.
This is expected because the support app is not from the Microsoft Store. It is provided by
Your Company Name
to allow me to help you.
Step 3: Tell me your ID and Password
After a few seconds, a small
Remote Support
A window will appear.
-
You’ll see a
User ID
a number and a
Password
.
-
Please
read both of these to me
, or paste them into our chat.
I will use this information to connect to your computer. These details are temporary and only work for this session.
Step 4: Wait while I connect
Once I have your ID and password:
-
I will connect to your computer.
-
A
chat box
will appear on your screen when the connection starts.
-
I’ll now be able to see your screen and (with your permission) control your mouse and keyboard.
You can use the chat box if you prefer to type instead of talking on the phone.
Step 5: Ending the session
When we’re done:
-
Simply
close the Remote Support chat window
.
-
As soon as you close it, I will lose access to your computer and I will lose the ability to see your screen anymore.
If you’re ever unsure, you can also call me and I’ll confirm that the session has ended on my side too.
Note for Windows 10 users
If you’re on
Windows 10
instead of Windows 11, the screens may look slightly different:
-
Your Start menu and taskbar icons are aligned to the
left
instead of the centre.
-
The security messages may have a slightly older style.
However, the steps are
the same
:
-
Run the file from your Downloads folder.
-
Click
More info → Run anyway
if Windows warns you.
-
Click
Yes
if asked to allow the app.
-
Read me your
ID
and
Password
from the Remote Support window.
If anything on your screen doesn’t match these steps, just tell me what you see and I’ll guide you through it.
Thanks,
Your Name
Your Role / IT Support / Service Desk
Your Company
5. Security, privacy and compliance best practices
-
5.1 What Should IT Teams Do?
-
5.2 Of What Should Users Be Reminded?
Even when users trust you,
how
you run sessions matters—for auditability and for their peace of mind.
Pointers for agents and IT teams
-
Use official binaries and links only
Always distribute the End-user client from your corporate portal or the official RDS-Tools site, not from a random file-sharing service.
-
Verify the user before connecting
Particularly in regulated environments, confirm identity via known channels (ticket system, corporate IM, helpdesk phone number).
-
Rely on temporary access details
In attended scenarios, connect only using the
session ID and password
shown in the End-user client. These are meant to be short-lived keys for that session only.
-
Document what you’ve done
Use screenshots or session recordings from the Agent actions panel when you need traceability and add that to your ticket.
-
Be explicit when using unattended access
If you also deploy unattended agents, make sure your policies and user communications clearly distinguish “I can only connect when you launch this app and read me a code” from “I can connect in the background for maintenance”.
What reminders may benefit users?
-
They should
never
share their session ID and password with anyone claiming to be IT unless they initiated the support request through an official channel.
-
They can
always end the session
themselves by closing the Remote Support chat window.
-
It is good hygiene to close email, HR tools, personal messaging apps and banking tabs before they start.
This reinforces that remote support is something done
with
them, not
to
them.
6. Quick troubleshooting Q&A for agents
-
6.1 User Can’t Find the Download
-
6.2 SmartScreen or Security Prompts Block the App
-
6.3 ID and Password Don’t Work
-
6.4 Supporting Older Operating Systems
A short FAQ section in your article (or internal KB) can save a lot of time.
The user can’t find the download.
-
Ask them to open
File Explorer → Downloads
.
-
If the browser shows a recent downloads bar, guide them through clicking.
Open file
.
-
If needed, resend the link (from your RDS-Remote Support portal or your internal distribution point).
SmartScreen says it blocked the app.
-
Confirm they are using the official link you sent.
-
Have them click
More info → Run anyway
, provided this complies with your security policy.
-
Explain briefly that this is normal for line-of-business tools not in the Microsoft Store.
“They gave me an ID and password but I get an error.”
-
Confirm they are reading
the current ID and password
from the running End-user client, not from an old screenshot or email.
-
Check that they have not closed the chat/session window.
-
Verify basic connectivity: corporate VPN, firewalls and whether they can reach external sites.
User is on an older OS.
-
Officially, desktop support starts at
Windows 7 SP1
, with modern support for Windows 10 and 11; server support starts at Windows Server 2008 R2.
-
Very old or unpatched systems may need additional preparation (e.g., .NET installation).
Wrapping up: standardise the experience
-
Integrating RDS Tools Remote Support into Your Support Stack
-
From One-Off Instructions to Reusable Scripts
The technical side of remote support is the easy part. The human side resides in explaining what you’re doing, building trust and not wasting 15 minutes just getting the user to find their Downloads folder and is definitely where you gain or lose efficiency.
How have you integrated RDS-Tools Remote Support into your Support Stack?
RDS Remote Support
gives you:
-
A
clean, unified workflow
for starting attended sessions with ID + password.
-
A
simple End-user client
that is easy to explain in a few lines.
-
The
tooling you would expect
as an IT professional, including file transfer, screenshots, recordings, system tools, directly in the session.
Have you transitioned from one-off instructions to reusable scripts?
Hopefully, this article has helped you take the final step:
standardise
how you and your team talk users through sharing a screen. Make good use of the template above, since it could become:
-
An email macro in your ticketing system.
-
A canned response in your chat tool.
-
A published article in your customer-facing knowledge base.
Now that’s done, going from “call” to “control” stops being a mini-project and becomes a
repeatable, predictable part of your support process
exactly what professional remote support practice should aim for.
RDS Remote Support Free Trial
Cost-effective Attended and Unattended Remote Assistance from/to macOS and Windows PCs.
)

)
)
)
)
